Monday, December 15, 2008
Feline approved
What you don't see in the picture is what they were doing just a few seconds before this photo was snapped. The camera never seems to be available when you need it, huh? Just seconds before they were acting as if the brown rug had catnip woven into it! They were rolling and stretching and rubbing their faces all over the nubby brown texture.
These are two more rugs for Christmas presents. I feel fairly safe posting these as the recipients are too little to be reading blogs. LOL
Friday, October 10, 2008
Recycle Weaving
The beauty of this was the lack of precision. A drip here, a dribble there, a splash of this color, a squeeze of that color. I used up all of the excess dyes. The above photo shows all of the dyed t-shirts stacked up ready to go home. I forgot to get in-process photos. Oops. Took them home, tossed them in the washer and dryer and they're ready to be prepared for weaving.
I cut off the sleeves and the bottom hem. Then I cut the shirts into strips parallel to the bottom hem. I cut these strips 2" wide. You get some pretty long strips until you get to the chest section where the sleeves were but even those strips are useable. When I joined the strips to make my weft, I alternated a long and short strip so that the knots were fairly evenly spaced apart.
For the jeans, I used the fabric from the legs. I could have saved the pockets and waistbands for another project but really, I have enough stuff in my house and need to start purging. Jeans are always getting worn out so if I ever do desire to make a project using jean pockets, I'll just start saving then. The jean fabric, because it's considerably thicker, was cut at 1" widths.
For the warp, I used a Pepto Bismal pink 8/4 carpet warp. It coordinates perfectly with the t-shirts and even looks nice on the jean side. The design is reversible by using a double-weave technique. I made some other rugs last year and really like how thick they come out. This rug is coming out even thicker - must be the jeans. It's going to be so cushy under tiny tootsies. This one is a gift for one of my nieces.
Tuesday, September 23, 2008
How big is your stash?
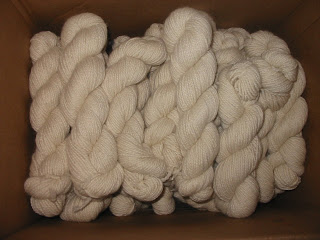
What does your weaving stash look like?
We have a name!
I'm still having to go to the ranch daily to give Bliss an antibiotic shot. We got the test results back yesterday and it showed she had a form of e-coli in her bladder causing an infection. So now she's on PenG (a form of Penicillian) and NuFlor. I sure hope this cures her. I feel so bad that she's having to get shots twice a day for the PenG. My fear is she's going to associate bad things with being haltered. I'm just going to have to work extra hard after this is done to keep haltering her and find something that she likes as a treat. She has eaten grain from my hand once so my plan is to give her some of that at the end of each round this week.
Wednesday, September 17, 2008
Newest, and last for the season, Cria
Monday, September 15, 2008
I need to buy a lottery ticket!
I'll head down there later today. First I have to collect the kids at the end of school, drop them at their respective activities and then I can head down there. Ethan will come with me so I'll have him take pictures.
Hmmmm.... need a name that starts with "D". Any suggestions?
Speaking of quick
That was quick
While at the ranch, I had 3 tasks to accomplish:
1. give Bliss her Naxcel shot for a bladder infection
2. weigh Ciara
3. catch Ciara visiting the poop pile to make sure all the plumbing works properly
I arrived at the ranch around 10:30am. I figured I'd be there a few hours trying to accomplish the third of my tasks. First, I cleaned up the pen. It gave me a chance to watch the girls. Kay (due sometime in the next few days or months) was laying down and shifting from side to side. Bliss is still going to the poop piles and peeing teaspoons at a time. Murphy is a phenomenal mom - she stands so well for Ciara when she wants to nurse, even moving a leg out of the way if it's needed. Ciara is growing like she should be. She was 19 pounds at birth and was a little over 21 pounds today at 5 days old. Perfect weight gain!
I've been giving Bliss her Naxcel shots (4 so far). This is a first for me - giving shots. Saturday we (Wayne and I) attempted to have me give the shot on my own (i.e. without him holding her). It didn't work - I wasn't confident enough. Today though, I caught her, haltered her, tented the skin, and gave the shot. When I was done, I looked at Wayne and said "Oh! I guess I did that all by myself, huh? Cool!"
A few minutes later, Ciara went to the poop pile and did her business. Steady flow of urine and a nice mass of feces. All's well on that front! Guess I'm done for the day! 11:30 and I'm outta there.
Saturday, September 13, 2008
Look who showed up!
Thursday morning I got a call from Wayne to tell me I have a cria on the ground. Yippee!! But wait, it's not October. I wasn't expecting any deliveries until October. Hmmm.... I must have "misfiled" the information the breeder gave me. I'll bet she said she bred in October (which means deliveries in September) but I misheard it as they'd deliver in October. Oops. So while I was at the ranch checking out our new cria, I checked the other mom-to-be and sure enough she's bagged up. That means she'll be delivering soon. Or not - it could be a few weeks from now too. Darn alpacas refuse to read the instruction manual.
Oh - I guess you want to know whether the cria is a girl or a boy? Well, our first two crias were girls so we fully expected to have a crop of boys this year. Not so. It's another girl! We've named her Ciara - pronounced KEE-ra. It's Gaelic for "dark one" referring to coloring as in dark hair and eyes. The name definitely fits her!
Tuesday, August 19, 2008
Back from Alaska!
We spent a week on the Holland America cruise ship ms Amsterdam cruising around Southeast Alaska and the Inside Passage. DH took nearly 2000 pictures and is editing them for posting. I've seen the preliminary shots and he's got some that I'll definitely be getting printed and framed. My head is still occasionally "swimming" - apparently it can take up to a week for your equilibrium to work it's way back to normal.
As soon as pictures are available, I'll let everyone know!
Friday, July 18, 2008
Take Along Toys
At the same time, I've been wanting to find something new to try. I wanted something that was small and easy to bring along for those idle times but I didn't want to go back to things I've tried in the past: knitting, crochetting, tatting. I thought about doing some embroidery but couldn't find something that inspired me.
Then I read in Tien's blog about the beaded beads her mom does. Now THAT sounded interesting. So I checked out the links to the beading sites that Tien provided and I was hooked! I was thrilled when I found the free bracelet pattern! Now I could try this new interest for a minimal outlay - since I already had beads and needles from other ventures, it only cost me a mere $3 for some beading thread.
I started the pattern last night. I knew I wouldn't have enough green beads to make a whole bracelet but I'd figure something out as I went along. I always do. About 4 rounds into this, I stopped and looked at the lovely beaded bead I had made. It was gorgeous! I could use something like this on my next designed garment. Heck, I could have used something like this on my final project a few months ago. I decided I'd continue and use up the green beads I had and then use the final piece in a simple necklace. The next hurdle would be in figuring out how to string a necklace together. I've never done jewelry before. Oh, but then I remembered I have some purple rat-tail leftover from my Draping Class's final project. That would work perfectly!
What do you think?
Tuesday, July 15, 2008
Trouble in Mac-land
The problem is that sometimes when a treadle is pushed, one of the shafts (it varies which specific one) that ISN'T supposed to lift will partially lift. I can hand push the offender down to where it belongs - it feels "tight" like it was squeezed by the surrounding shafts into lifting. In other words, it's definitely not a case of something catching and lifting it. It's probably best to show you.
This is what I should see.
The black bar in the background is the top of the shaft that's partially lifting.
When there's a sticky shaft, the shed looks like this. You can see strings from the stuck shaft hanging out there in the middle.
I suspect the loom needs some lubrication. When I first got this loom I asked about that. Some suggested WD40; others suggested actual oil; and one suggested paraffin. Since my loom sits over carpet, I went with paraffin. I suspect it didn't work so well. It's the metal parts that I suspect need some help; I'm not sure wax was the right choice. Or maybe I just didn't do it right.
I have both WD40 and oil. In fact, I have some spinning wheel oil in one of those long needle bottles. Which do I use? And where do I put it?
Tuesday, July 08, 2008
Wide Warp
The current project on the Macomber is a 40" wide warp of 5/2 cotton that will use UKI Bamboo (roughly 5/4) in the weft. They're intended to be beach towels for dh's co-worker. The pattern is a modified 5 shaft huck lace. I say modified because I had to put some of the threads from shaft 4 onto a spare shaft (in this case, shaft 6) because I knew I'd run out of heddles. I also put a plain weave selvage onto shafts 7 and 8.
One fear I had with this project was possibly having trouble with throwing a shuttle on such a wide warp. Luckily, I had treated myself to a Bluster Bay end feed shuttle at the recent CNCH conference. Before going to the conference, dh had given me $100 to treat myself. Oh boy, what a treat this pretty thing is!
The shuttle feels so incredibly soft - the craftsmanship is impeccable! And look at these selvages - they're perfect. Another benefit is that weaving goes uber-fast! I'm able to weave up a bobbin's worth in the same time it takes to wind both of the empty pirns I have for this shuttle.
Tuesday, June 24, 2008
In store for a busy weekend
I must say, as hard as it might be on parents shuffling kids to and fro, South Bay Dance Center does a phenomenal job with their showcase. They create wonderful opportunities for dancers to get as much stage time as their experience allows. For example, the very young dancers (3-5yo) are only in one program, put on stage at the very beginning of the show, and parents are allowed to pick them up backstage right away. If you've reached a level 1B (usually 9-12yo), then you perform on stage in at least two programs. If you've reached a level 2A or higher, then you're on stage for all 5 programs. Yes, there are 5 shows over the two-day weekend. And IF you're like my daughter, where of the 8 classes she took this year, 6 of them are "performing" classes and of those 6, 3 are level 2 or higher, THEN you are on stage a whole lot.
Welcome to the world of theater daughter! You'll do great! Love, mom
Thursday, June 12, 2008
Annual Shearing Day
The girls at their new digs. This is their version of "Don't Take My Picture!" Kay on left, Bliss in center, Murphy on right.
Since Bliss wouldn't cooperate and show us her lovely coloring, we had Dana catch and hold her for us. The 'funny' lighting is because they're standing in between the sun and the shadow of a tree. Click on the pic for a larger version.
Shearing day is a bit of a double-edged sword: it's fun but it's hard work. At Foothill Alpacas where our animals are agisted, we use a table for shearing. To shear an animal, you need:
1 shearer
1 green guy (so called because he holds the head and gets covered in green slime when the 'pacas get upset)
1 toe nail clipper who also helps get the animal onto the table
2 fiber collectors - one for prime and another for neck/leg
2 people to catch - one of those two also blows out the animal
and at least 2 extra people.
The shearer is the boss. Everyone else is there to help him/her in any way they can. The fiber collectors also put the names/dates on the bags and, if desired, pull the fiber sample that gets shipped off for micron testing. The catch people also blow out the animal's fleece (while it's still on the animal) to get rid of any hay bits and dirt. While this does disturb the lock structure, if you're shipping the fleece straight off to processing, it doesn't matter. In fact, the shearer will appreciate it because shearing with all that excess dirt dulls the blades really fast.
The two extra people are in case someone gets hurt. We had 2 shearing days at Foothill this year and had injuries on the first one. That left us a bit short-handed so we made sure we had enough help on the second day.
The FUN part of shearing day is gawking at the 'pacas after their shorn. They always look like something out of a Dr. Seuss book! My favorite books are Dr. Seuss books!
Here's the "after":
Tuesday, June 10, 2008
Designing a garment by draping
I've been sewing all my life. I was lucky enough to have a mom who sewed and taught me at an early age. I've come to understand now that not everyone was so lucky (Thanks mom!). She taught me how to use commercial patterns and over the years I figured out how to mix and match pattern pieces. But designing a garment from scratch was out of my realm.
So in January when I found out the boss I worked for part-time was moving away and I would have some free time, I decided to take a class in the most-excellent fashion design program at West Valley Community College. I had taken classes from the other nearby community college with a fashion design program, Canada College but WVC is muuuuuuch closer. As I'm really a "hands-on" person when it comes to design of any type, FD-060 Professional Draping, really sounded like something up my alley.
In case anyone out there is thinking of taking this class, I won't sugar coat the experience. It was brutal. I expect it would have been less rigorous had I not had prior obligations of chauffeur and chess club coordinator so that I could have gone to lab during the limited hours (that darn Law of Physics - why can't you be in two places at once?). As it was, I could only go on Tuesday and Thursday after class and occasionally on Thursday evenings. Because this class required the use of a dress form, and it couldn't be any ole dress form - it had to be one in the lab, you must get the work done during class or lab. Sewing could be done at home however it consisted of a small portion of the overall work.
At any rate, I can expand on the class's requirements in another post. In this one, I want to skip to the end and show off my final project! But first, let me walk you through the design process.
I wanted to do a jacket. Searching fashion websites turned up these:
Wednesday, June 04, 2008
Long Lost Bamboo Towels
Here is a picture of 2 of the towels. The one on the left has been wet finished but not ironed. It does 'grow' a bit once it's ironed. The one to the right (and half of it is under the one on the left) has been turned sideways and is not yet wet finished.
I used UKI Bamboo (aka Bamboodle) from Village Spinning and Weaving as warp and weft. It's quite thick - listed as a 5.24/4 yarn. I sleyed 16 inches set it at 12 epi. My notes say the warp was 3 yards long but it's likely a bit longer than that - rounding up is a good thing to do with warps so that I have enough room to do some samples. My plan was for 4 towels at 22" per towel plus loom waste. Turns out I got 5 towels out of the warp.
The pattern is a traditional huck lace from Davison's "A Handweaver's Pattern Book" on page 94. I played with the pattern and found I could get a plain weave selvage. I also discovered I could change up the huck pattern by changing the treadling. This was a welcome discovery because it meant I could make every towel a bit different.
So, for the final stats:
on loom: 16" wide by about 22" long (depends on the pattern I used)
off loom: 13" wide by 20" long (for one specifically)
wet finished and ironed: 11.5" wide by 14.5" to 15.5" long
Tuesday, June 03, 2008
Upcoming posts
The first one covers that Professional Draping fashion design class I took recently. The final project is done, submitted, graded, and returned. It looks just lovely! But since it's a gift for my sister and she's not seen it yet, I have to wait until her package has been delivered to share the photos with everyone else. USPS tells me it'll arrive on Thursday.
The second post is about shearing day this past Sunday. Our girls were shorn at their new home. I always get a chuckle out of the before and after photos. Dh is away on a business trip so I have to wait until he returns and edits the photos to get them for here. The biggest difference is Bliss. Wait until you see her!
Saturday, May 31, 2008
All together now
The clinic has several vets - the head vet is very good at camelid care as are two others. But there was one in particular we weren't happy with. And it seemed she was the one they always sent over. In her defense, she was great horse vet. And in the clinic's defense, the vet who used to always work with us, and who we loved, was out on an extended maternity leave.
At the other ranch, where I had the newly purchased girl, their servicing vet has several decades of camelid experience and was even a consultant in South America during the imports. He knows his stuff. So I ask, with whom would you choose to house a pregnant maiden?
Fast forward to today: the pregnant maiden delivered a beautiful rose grey girl nearly a year ago. The new mom is yet again a mom-to-be with proven mothering instincts. And Murphy, the girl I bought is also expecting. The vet in question has moved to a practice in another state and the vet we used to work with is back from maternity leave. Travelling between two ranches is hard (and expensive given the cost of gas these days). So it's time to bring everyone together.
Tomorrow is one of the shearing days. All the girls get haircuts while the boys have to wait until Saturday for theirs. I love shearing day. It's hard work. But those bags of fiber are to die for!
Tuesday, May 20, 2008
Google Reader
I'm also not happy that T doesn't update my list even when my own blog is updated. It listed my last post as over 3 months prior. We'll see if Google Reader works better.
What is your favorite tool to track blogs you like to read?
Blog Claim
Technorati Profile
I hereby claim my own blog so Technorati will include me in their search engine.
Don't look for this blog entry after a few weeks - I'll be deleting it.
Sunday, March 30, 2008
Documenting dye samples
Recently, another dyer while demonstrating shibori dyeing showed us her dye samples. It was a large piece of fabric she "sacrificed" so that she could have a record of the dye colors at various dilutions. Suddenly, it clicked! That was what I needed!
I'm currently taking "Garment Design through Draping" class at West Valley College. Draping not only uses lots of muslin, it wastes a lot too. I have no problem with the idea of needing to sacrifice large pieces of muslin in order to get a beautiful end result; it's just that my heart can't bear to throw the large pieces away. So I've been stuffing the sizable pieces into my bag "for future use". I know, I need more crap like I need a hole in my head but there *has* to be a use for them. Right?
I pulled out 7 of the scraps for this dyeing documentation project. I may not be dyeing on cotton fabric all of the time, but it's far better than hoping the color on the bottle is accurate. And I found out some very interesting things!
For example, some of the colors will bleed out along the edges. Look at the raspberry - it is a very pretty red-purple in the center, but at the edges it turns blue. When shibori dyeing, that's a dye you'll want to use. The bright green had this absolutely lovely yellow bleed-out but it washed away - I'm not sure why but I'm quite disappointed.
Another interesting observation was how some dyes don't change their final color much even when diluted. That's good to know so you don't waste dye powder. The excess gets washed out.
I think I have 20+ colors of this Procion dye from Dharma. I was only able to do 7 colors because I only brought 7 jars with me. Documenting all of the dyes is on my list of things to do. Warmer weather is fast approaching so I expect to be done soon.
So, exactly how did I do these samples?
First, the fabrics were soaked in 1/4c of soda ash to 2 cups of water. The fabric weighed 4 ounces. This is straight-off-the-bolt white cotton muslin; I did not pre-wash it. After soaking for 10 minutes, the fabric was dried on the handy-dandy clothesline that the previous owner left and I've now come to appreciate. (Note to self: get clothespins before the next trip up there.)
Next, the dyes were mixed. I started with 1/4 tsp of dye powder to 1/4 cup of warm water. The house has well water which is probably a tad hard. I only used warm water to facilitate the dilution. Subsequent additions of water were cold.
For each piece of fabric, I used a Sharpie and wrote the name of the color, it's number, and "1/4tsp + 1/4 c water increments". After the samples were made, I also wrote 1, 2, or 3 next to the spot for each color sample.
To apply the dyes, I poured a few drops onto the cloth and then used my finger to spread it out. Plastic gloves are a must. It would have been better to use a eye dropper if only for better control of the pouring as well as avoiding the drips along the lip of the jar.
After the first dilution is applied to the cloth, add another 1/4 c of water to all of the jars of dye. Repeat the sample application. And then do it again a third time. Be sure to keep track of which sample is which dilution - I lined them up in a row but also marked them with a sharpie.
Some of the dyes got a fourth dilution only because the jar would hold it. Note to self: make sure to use large jars - small jelly jars don't work for this.
Once the samples were done, I wrapped them up with plastic wrap and left them to cure overnight. In the morning I unwrapped them, rinsed them and tucked them away. I couldn't let them dry - we were leaving to go home. On the red wine sample, some of the blue bled onto the cloth during the transport home. It doesn't look like any of it penetrated the color sample though, so I won't redo it. Also, in the bottom corner of that one, we put a sample of what looks like a brownish eggplant color. As we were cleaning up, we dumped the teal, orange, and periwinkle dye water into one jar. We were going to pour it down the kitchen drain but it looked quite pretty so we took a sample and kept the bottle of liquid. It's waiting for my return to the house in the mountains.
It is worth noting that since this process keeps the soda ash away from the dye, the mixtures will stay quite useable for a few months. Cover them and keep them for future use.
One thing I might do differently next time is to do 2 sample sheets of the same color - one sheet would be dry and the other would be wet. I want to see if it affects the bleed-out.
Saturday, March 29, 2008
Want to Start a 4H Alpaca Project but don’t know where to begin?
4-H is an organization for youth, ages 5-19, that promotes hands-on learning and is based on parent and volunteer participation. 4-H welcomes all youth and adult volunteers from all backgrounds in all locales.
The United States 4-H program is run through county Cooperative Extension offices, the state universities, the United States Department of Agriculture (USDA), and a variety of volunteer councils and foundations at the county, state, and national levels. In California, the 4H program is run through the University of California at Davis. That’s right! 4H is run by UCDavis - the same university where Calpaca has established a veterinary scholarship.
How do I get started?
To get started, find a club now and go to the next general meeting. Introduce yourself, and explain that you’re interested in starting an alpaca project next year. The CA 4H website can be found at http://ca4h.org/4hinfo/proginfo/delivery.asp On that page is a menu to help locate the nearest club.
For me, someone with absolutely no prior exposure to 4H, it was helpful to go to a few meetings in the Spring to become familiar with the general meeting proceedings. I chatted with other project leaders and learned what to expect while managing an animal project. Showing up at these meetings also helped put the word out that an alpaca project was being planned for the coming year. The 4H calendar runs September to August (similar to a school year).
Each 4H club has a coordinator known as the community leader. This person acts as the contact point between the county-wide coordinator and their own club. He/she handles all the registrations, the training schedule, the monthly calendar, as well as informs the club of county-wide events. Make sure the community leader knows you are interested in becoming a project leader for the coming year. They will add you to the planning meetings which typically take place over the summer.
However, if it’s Fall or Winter when you decide to start a group, you can still start one for that year. The community leader will be your best resource. If you’ve missed the one-time required training session offered in your region, you will simply pair up with a leader from another project.
Becoming a 4H leader is relatively easy. Each leader must fill out an application and get a background check done. New this year is that each project is required to have two certified adults at all project meetings. In my project, my co-leader is a parent who has run the leadership gauntlet but isn’t managing a project of her own this year. California 4H also has restrictions on the age of children joining animal projects. Alpacas are not on the pre-approved list for children younger than 9 (children 5-8 are called Clovers).
What do we do in an Alpaca Project?
The scope of any project is at the discretion of the leader. In my case, I took lead from the kids in my project. The agenda I set at the beginning included visiting one local AOBA alpaca show; explaining basic care, feeding, and anatomy; discussing fiber (attributes of each type, differences in quality, basic processing steps, finished goods, tour of a farm store); and demonstrating obstacle performance. Each meeting began with the educational lesson (maybe 30 minutes) followed by the students catching, haltering, and walking their assigned alpaca. When we began the obstacle performance demonstrations, everyone participated with their alpaca. Of all of the lessons, this was the one that my group of kids this year decided they liked best. I’ve had a few other girls approach me about offering an alpaca fiber project and may do that next year in addition to this alpaca performance project.
In conclusion…
The end of the 4H year concludes with the students filling out a "year end project report" called a Project Report. As 4H students they also have a form called a PDR (Personal Development Report) that covers their entire work with 4H. As this is my first year with 4H and we are not yet at the end of it, I can only say that I’m going to be relying a lot on the experienced leaders to help me help my students get these reports completed! I do know this: I’m very glad I just jumped in. These kids love working with the alpacas! If only we could read the animals’ minds, I’m sure they’d say they love it too!
Friday, January 18, 2008
Honeycomb fabric
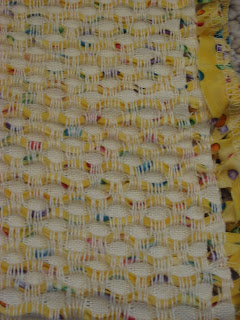
Over the holidays, I found a design in Laura Fry's "Magic in the Water" book that I want to do. Project 5 - cotton chenille jacket. I will use fine bamboo yarn and cotton chenille. However, there's been a lot of buzz on the weaving at yahoogroups list about how difficult chenille can be so I was hesitant. Also, it's a structure I haven't worked with before, so I thought it might be a good idea to use a shorter warp as a test. Then I ran across a honeycomb fabric project in "The Best of Weavers: Fabrics that Go Bump" and realized the structures are the same, just implemented a bit differently. One uses cotton chenille yarn and the other uses fabric strips. So gave it a try.
To this...
The fabric hasn't been wet finished yet. It'll probably pull up even more afterwards.
Likes: I love the texture this fabric has as a result of the draft. I like how it tones down the brightness of the fabric but still is quite colorful.
Dislikes: I feel like I wasted my precious bamboo yarn. This project would have been just as nice with a cotton yarn. I should have gone with the chenille instead of the fabric strips for this warp.
I'm not sure how I'll use the fabric. It's almost too heavy to be used in a garment. If the white yarn were cotton, I'd jump at turning it into a bag but the fact that it's bamboo is leaving me hesitant. Not that I don't think it'll hold up - just that it feels like I'm wasting it.
We learn by doing. I did. And I learned.