Showing posts with label dyeing. Show all posts

Tuesday, March 24, 2009

Productive Day


Wool roving dyed in the crockpot -
crimson red, lilac, and chocolate

wool roving


Then spun into a single which was plied with
a single of carmel colored alpaca to make this pretty yarn.

wool and alpaca yarn


More wool roving dyed in the crockpot -
teal, brilliant blue and chocolate

more wool roving


Here it is as a singles yarnsingles wool yarn

Friday, October 10, 2008

Recycle Weaving

A few months ago I was cleaning out closets with the intent to donate to Goodwill. A lot did go to Goodwill but some of the t-shirts and jeans were not Goodwill quality (rips, stains, spilled paint, etc) so I set them aside. I knew I could use them to make throw rugs. Around the same time I was creating my dye samples. I put aside the leftover dye for an upcoming guild dye day. When that day came, I grabbed a bunch of t-shirts and put the leftover dye to good use.

t-shirt pile after dyeing

The beauty of this was the lack of precision. A drip here, a dribble there, a splash of this color, a squeeze of that color. I used up all of the excess dyes. The above photo shows all of the dyed t-shirts stacked up ready to go home. I forgot to get in-process photos. Oops. Took them home, tossed them in the washer and dryer and they're ready to be prepared for weaving.

I cut off the sleeves and the bottom hem. Then I cut the shirts into strips parallel to the bottom hem. I cut these strips 2" wide. You get some pretty long strips until you get to the chest section where the sleeves were but even those strips are useable. When I joined the strips to make my weft, I alternated a long and short strip so that the knots were fairly evenly spaced apart.

For the jeans, I used the fabric from the legs. I could have saved the pockets and waistbands for another project but really, I have enough stuff in my house and need to start purging. Jeans are always getting worn out so if I ever do desire to make a project using jean pockets, I'll just start saving then. The jean fabric, because it's considerably thicker, was cut at 1" widths.

For the warp, I used a Pepto Bismal pink 8/4 carpet warp. It coordinates perfectly with the t-shirts and even looks nice on the jean side. The design is reversible by using a double-weave technique. I made some other rugs last year and really like how thick they come out. This rug is coming out even thicker - must be the jeans. It's going to be so cushy under tiny tootsies. This one is a gift for one of my nieces.

Sunday, March 30, 2008

Documenting dye samples

My issue with dyeing is that I can't predict the color ahead of time. No matter how much I try to follow the directions I've found on the web, nothing comes out consistently the same. And that's annoying.

Recently, another dyer while demonstrating shibori dyeing showed us her dye samples. It was a large piece of fabric she "sacrificed" so that she could have a record of the dye colors at various dilutions. Suddenly, it clicked! That was what I needed!

I'm currently taking "Garment Design through Draping" class at West Valley College. Draping not only uses lots of muslin, it wastes a lot too. I have no problem with the idea of needing to sacrifice large pieces of muslin in order to get a beautiful end result; it's just that my heart can't bear to throw the large pieces away. So I've been stuffing the sizable pieces into my bag "for future use". I know, I need more crap like I need a hole in my head but there *has* to be a use for them. Right?

I pulled out 7 of the scraps for this dyeing documentation project. I may not be dyeing on cotton fabric all of the time, but it's far better than hoping the color on the bottle is accurate. And I found out some very interesting things!

For example, some of the colors will bleed out along the edges. Look at the raspberry - it is a very pretty red-purple in the center, but at the edges it turns blue. When shibori dyeing, that's a dye you'll want to use. The bright green had this absolutely lovely yellow bleed-out but it washed away - I'm not sure why but I'm quite disappointed.

Another interesting observation was how some dyes don't change their final color much even when diluted. That's good to know so you don't waste dye powder. The excess gets washed out.

I think I have 20+ colors of this Procion dye from
Dharma. I was only able to do 7 colors because I only brought 7 jars with me. Documenting all of the dyes is on my list of things to do. Warmer weather is fast approaching so I expect to be done soon.

So, exactly how did I do these samples?

First, the fabrics were soaked in 1/4c of soda ash to 2 cups of water. The fabric weighed 4 ounces. This is straight-off-the-bolt white cotton muslin; I did not pre-wash it. After soaking for 10 minutes, the fabric was dried on the handy-dandy clothesline that the previous owner left and I've now come to appreciate. (Note to self: get clothespins before the next trip up there.)

Next, the dyes were mixed. I started with 1/4 tsp of dye powder to 1/4 cup of warm water. The house has well water which is probably a tad hard. I only used warm water to facilitate the dilution. Subsequent additions of water were cold.

For each piece of fabric, I used a Sharpie and wrote the name of the color, it's number, and "1/4tsp + 1/4 c water increments". After the samples were made, I also wrote 1, 2, or 3 next to the spot for each color sample.

To apply the dyes, I poured a few drops onto the cloth and then used my finger to spread it out. Plastic gloves are a must. It would have been better to use a eye dropper if only for better control of the pouring as well as avoiding the drips along the lip of the jar.

After the first dilution is applied to the cloth, add another 1/4 c of water to all of the jars of dye. Repeat the sample application. And then do it again a third time. Be sure to keep track of which sample is which dilution - I lined them up in a row but also marked them with a sharpie.

Some of the dyes got a fourth dilution only because the jar would hold it. Note to self: make sure to use large jars - small jelly jars don't work for this.

Once the samples were done, I wrapped them up with plastic wrap and left them to cure overnight. In the morning I unwrapped them, rinsed them and tucked them away. I couldn't let them dry - we were leaving to go home. On the red wine sample, some of the blue bled onto the cloth during the transport home. It doesn't look like any of it penetrated the color sample though, so I won't redo it. Also, in the bottom corner of that one, we put a sample of what looks like a brownish eggplant color. As we were cleaning up, we dumped the teal, orange, and periwinkle dye water into one jar. We were going to pour it down the kitchen drain but it looked quite pretty so we took a sample and kept the bottle of liquid. It's waiting for my return to the house in the mountains.

It is worth noting that since this process keeps the soda ash away from the dye, the mixtures will stay quite useable for a few months. Cover them and keep them for future use.

One thing I might do differently next time is to do 2 sample sheets of the same color - one sheet would be dry and the other would be wet. I want to see if it affects the bleed-out.

Monday, May 29, 2006

Overdyeing - a kids' project

One of the "jobs" I have these days is being a substitute teacher. For now, I limit my subbing to the school where my own children attend. Since my oldest has gone through almost all of the grades there, I am quite familiar with all of the routines and curriculums. That helps to eliminate some of the stress a sub goes through when faced with a classroom of children eager to convince you "Mrs. X really does let us work together on math worksheets."

Last week I subbed in a 3rd grade class. This was a pre-arranged two day assignment. I love multi-day assignments because it allows me to plan ahead a fiber project for the kids. This time the kids overdyed light brown wool with food coloring. Educationally, it was a science experiment, in case the principal came in wanting to know how food coloring and wool were related to the students' instructional time. The presentation only took about 10 minutes. Putting fiber into their cup took about 20 minutes.

First, we talked about different foods that can cause stains. Putting this in the context of "has your mother ever gotten upset that you got strawberries/hot chocolate/juice/ketchup/mustard/etc... on your clothes?" we talked about natural dyes (strawberries, chocolate, mustard), fiber types (cotton, wool, synthetic) and the process of staining, aka dyeing.

Next, each student was given a strip of light brown wool roving about 12 inches in length. We used Wilton's gel cake decorating colors, which sadly I've recently learned is not light-fast but it served its purpose for this experiment. Each student picked a color. In cases where more than one student picked a color, we made an effort to make different strength solutions to get light and dark shades. Note: Ahead of time I made a list of possible colors on the board limiting the number of students per color lest we have all the boys pick blue and all the girls pick violet.

We put water, a glug of white vinegar, and some of the Wilton's gel into cups. The kids put their roving into the cup, use a spoon to submerge it (we didn't pre-wet the fiber) and place the cup in the sunny windowsill. My intention was to dye this using a modified "sun tea" method. Unfortunately, the sun wasn't cooperating. I knew by the end of the day that I had to speed up the process. I made use of the microwave in the teacher's lounge after school. Three of the cups were left un-finished on purpose so the kids could see the difference.

On the second day, I showed the kids the un-finished cups with the rovings. The fiber did have some color change but the liquid was also still colored. Then I showed them the exhausted cups. They were amazed to see the colorful fiber but even MORE amazed at the clear liquid. "Where did all the color go?", they all exclaimed! I used the two liquid examples to emphasize the need for heat as an integral part of this particular dyeing process recipe.

We also looked at some of the violet and black rovings up close. These food coloring colors tend to split - meaning they'll separate into their main colors and strike fiber unevenly resulting in splotchy dyeing. Some fiber artists call that a "feature" and rely on it for effect. I used this feature to remind them how colors are made (violet = red + blue, green = yellow + blue, black = many colors) and explained that in this case the colors didn't stay mixed once in the water and after separating, the fiber dyed with the separate colors. In our experiments, one of the violets was pink streaked with blue and one of the blacks was green.
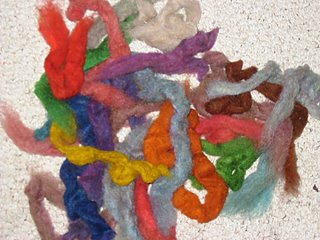

The colors we used were:
Christmas Red
Red, Red
Leaf Green
Kelly Green
Yellow
Orange
Violet
Royal Blue
Brown
Black
The strip of light brown roving at the top just above the purple-violet and to the left of the red is a strip of the original colored roving.


Things to do differently next time:
1. Use glass jars instead of plastic cups. It lets the kids see the contents from the side instead of having to stand over the cup to look inside.
2. Pick less colors. Period. I let each student "own" a color but this meant that as I was working with the one student, the rest sat there unoccupied. This particular class is wonderful so there weren't any problems but I wouldn't count on that being the case in the future. From now on, I would work in groups (this was a class of 19 so perhaps groups of 5) and give the others a worksheet to occupy them until it was their turn.

What will become of the rovings? Check back in a few weeks because I've volunteered (i.e. no pay) to go back to the class in early June to finish up.