What is 4H?
4-H is an organization for youth, ages 5-19, that promotes hands-on learning and is based on parent and volunteer participation. 4-H welcomes all youth and adult volunteers from all backgrounds in all locales.
The United States 4-H program is run through county Cooperative Extension offices, the state universities, the United States Department of Agriculture (USDA), and a variety of volunteer councils and foundations at the county, state, and national levels. In California, the 4H program is run through the University of California at Davis. That’s right! 4H is run by UCDavis - the same university where Calpaca has established a veterinary scholarship.
How do I get started?
To get started, find a club now and go to the next general meeting. Introduce yourself, and explain that you’re interested in starting an alpaca project next year. The CA 4H website can be found at http://ca4h.org/4hinfo/proginfo/delivery.asp On that page is a menu to help locate the nearest club.
For me, someone with absolutely no prior exposure to 4H, it was helpful to go to a few meetings in the Spring to become familiar with the general meeting proceedings. I chatted with other project leaders and learned what to expect while managing an animal project. Showing up at these meetings also helped put the word out that an alpaca project was being planned for the coming year. The 4H calendar runs September to August (similar to a school year).
Each 4H club has a coordinator known as the community leader. This person acts as the contact point between the county-wide coordinator and their own club. He/she handles all the registrations, the training schedule, the monthly calendar, as well as informs the club of county-wide events. Make sure the community leader knows you are interested in becoming a project leader for the coming year. They will add you to the planning meetings which typically take place over the summer.
However, if it’s Fall or Winter when you decide to start a group, you can still start one for that year. The community leader will be your best resource. If you’ve missed the one-time required training session offered in your region, you will simply pair up with a leader from another project.
Becoming a 4H leader is relatively easy. Each leader must fill out an application and get a background check done. New this year is that each project is required to have two certified adults at all project meetings. In my project, my co-leader is a parent who has run the leadership gauntlet but isn’t managing a project of her own this year. California 4H also has restrictions on the age of children joining animal projects. Alpacas are not on the pre-approved list for children younger than 9 (children 5-8 are called Clovers).
What do we do in an Alpaca Project?
The scope of any project is at the discretion of the leader. In my case, I took lead from the kids in my project. The agenda I set at the beginning included visiting one local AOBA alpaca show; explaining basic care, feeding, and anatomy; discussing fiber (attributes of each type, differences in quality, basic processing steps, finished goods, tour of a farm store); and demonstrating obstacle performance. Each meeting began with the educational lesson (maybe 30 minutes) followed by the students catching, haltering, and walking their assigned alpaca. When we began the obstacle performance demonstrations, everyone participated with their alpaca. Of all of the lessons, this was the one that my group of kids this year decided they liked best. I’ve had a few other girls approach me about offering an alpaca fiber project and may do that next year in addition to this alpaca performance project.
In conclusion…
The end of the 4H year concludes with the students filling out a "year end project report" called a Project Report. As 4H students they also have a form called a PDR (Personal Development Report) that covers their entire work with 4H. As this is my first year with 4H and we are not yet at the end of it, I can only say that I’m going to be relying a lot on the experienced leaders to help me help my students get these reports completed! I do know this: I’m very glad I just jumped in. These kids love working with the alpacas! If only we could read the animals’ minds, I’m sure they’d say they love it too!
Showing posts with label students. Show all posts
Showing posts with label students. Show all posts
Saturday, March 29, 2008
Monday, May 29, 2006
Overdyeing - a kids' project
One of the "jobs" I have these days is being a substitute teacher. For now, I limit my subbing to the school where my own children attend. Since my oldest has gone through almost all of the grades there, I am quite familiar with all of the routines and curriculums. That helps to eliminate some of the stress a sub goes through when faced with a classroom of children eager to convince you "Mrs. X really does let us work together on math worksheets."
Last week I subbed in a 3rd grade class. This was a pre-arranged two day assignment. I love multi-day assignments because it allows me to plan ahead a fiber project for the kids. This time the kids overdyed light brown wool with food coloring. Educationally, it was a science experiment, in case the principal came in wanting to know how food coloring and wool were related to the students' instructional time. The presentation only took about 10 minutes. Putting fiber into their cup took about 20 minutes.
First, we talked about different foods that can cause stains. Putting this in the context of "has your mother ever gotten upset that you got strawberries/hot chocolate/juice/ketchup/mustard/etc... on your clothes?" we talked about natural dyes (strawberries, chocolate, mustard), fiber types (cotton, wool, synthetic) and the process of staining, aka dyeing.
Next, each student was given a strip of light brown wool roving about 12 inches in length. We used Wilton's gel cake decorating colors, which sadly I've recently learned is not light-fast but it served its purpose for this experiment. Each student picked a color. In cases where more than one student picked a color, we made an effort to make different strength solutions to get light and dark shades. Note: Ahead of time I made a list of possible colors on the board limiting the number of students per color lest we have all the boys pick blue and all the girls pick violet.
We put water, a glug of white vinegar, and some of the Wilton's gel into cups. The kids put their roving into the cup, use a spoon to submerge it (we didn't pre-wet the fiber) and place the cup in the sunny windowsill. My intention was to dye this using a modified "sun tea" method. Unfortunately, the sun wasn't cooperating. I knew by the end of the day that I had to speed up the process. I made use of the microwave in the teacher's lounge after school. Three of the cups were left un-finished on purpose so the kids could see the difference.
On the second day, I showed the kids the un-finished cups with the rovings. The fiber did have some color change but the liquid was also still colored. Then I showed them the exhausted cups. They were amazed to see the colorful fiber but even MORE amazed at the clear liquid. "Where did all the color go?", they all exclaimed! I used the two liquid examples to emphasize the need for heat as an integral part of this particular dyeing process recipe.
We also looked at some of the violet and black rovings up close. These food coloring colors tend to split - meaning they'll separate into their main colors and strike fiber unevenly resulting in splotchy dyeing. Some fiber artists call that a "feature" and rely on it for effect. I used this feature to remind them how colors are made (violet = red + blue, green = yellow + blue, black = many colors) and explained that in this case the colors didn't stay mixed once in the water and after separating, the fiber dyed with the separate colors. In our experiments, one of the violets was pink streaked with blue and one of the blacks was green.
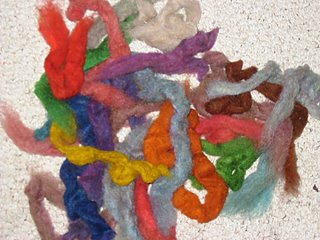
The colors we used were:
Christmas Red
Red, Red
Leaf Green
Kelly Green
Yellow
Orange
Violet
Royal Blue
Brown
Black
The strip of light brown roving at the top just above the purple-violet and to the left of the red is a strip of the original colored roving.
Things to do differently next time:
1. Use glass jars instead of plastic cups. It lets the kids see the contents from the side instead of having to stand over the cup to look inside.
2. Pick less colors. Period. I let each student "own" a color but this meant that as I was working with the one student, the rest sat there unoccupied. This particular class is wonderful so there weren't any problems but I wouldn't count on that being the case in the future. From now on, I would work in groups (this was a class of 19 so perhaps groups of 5) and give the others a worksheet to occupy them until it was their turn.
What will become of the rovings? Check back in a few weeks because I've volunteered (i.e. no pay) to go back to the class in early June to finish up.
Last week I subbed in a 3rd grade class. This was a pre-arranged two day assignment. I love multi-day assignments because it allows me to plan ahead a fiber project for the kids. This time the kids overdyed light brown wool with food coloring. Educationally, it was a science experiment, in case the principal came in wanting to know how food coloring and wool were related to the students' instructional time. The presentation only took about 10 minutes. Putting fiber into their cup took about 20 minutes.
First, we talked about different foods that can cause stains. Putting this in the context of "has your mother ever gotten upset that you got strawberries/hot chocolate/juice/ketchup/mustard/etc... on your clothes?" we talked about natural dyes (strawberries, chocolate, mustard), fiber types (cotton, wool, synthetic) and the process of staining, aka dyeing.
Next, each student was given a strip of light brown wool roving about 12 inches in length. We used Wilton's gel cake decorating colors, which sadly I've recently learned is not light-fast but it served its purpose for this experiment. Each student picked a color. In cases where more than one student picked a color, we made an effort to make different strength solutions to get light and dark shades. Note: Ahead of time I made a list of possible colors on the board limiting the number of students per color lest we have all the boys pick blue and all the girls pick violet.
We put water, a glug of white vinegar, and some of the Wilton's gel into cups. The kids put their roving into the cup, use a spoon to submerge it (we didn't pre-wet the fiber) and place the cup in the sunny windowsill. My intention was to dye this using a modified "sun tea" method. Unfortunately, the sun wasn't cooperating. I knew by the end of the day that I had to speed up the process. I made use of the microwave in the teacher's lounge after school. Three of the cups were left un-finished on purpose so the kids could see the difference.
On the second day, I showed the kids the un-finished cups with the rovings. The fiber did have some color change but the liquid was also still colored. Then I showed them the exhausted cups. They were amazed to see the colorful fiber but even MORE amazed at the clear liquid. "Where did all the color go?", they all exclaimed! I used the two liquid examples to emphasize the need for heat as an integral part of this particular dyeing process recipe.
We also looked at some of the violet and black rovings up close. These food coloring colors tend to split - meaning they'll separate into their main colors and strike fiber unevenly resulting in splotchy dyeing. Some fiber artists call that a "feature" and rely on it for effect. I used this feature to remind them how colors are made (violet = red + blue, green = yellow + blue, black = many colors) and explained that in this case the colors didn't stay mixed once in the water and after separating, the fiber dyed with the separate colors. In our experiments, one of the violets was pink streaked with blue and one of the blacks was green.

The colors we used were:
Christmas Red
Red, Red
Leaf Green
Kelly Green
Yellow
Orange
Violet
Royal Blue
Brown
Black
The strip of light brown roving at the top just above the purple-violet and to the left of the red is a strip of the original colored roving.
Things to do differently next time:
1. Use glass jars instead of plastic cups. It lets the kids see the contents from the side instead of having to stand over the cup to look inside.
2. Pick less colors. Period. I let each student "own" a color but this meant that as I was working with the one student, the rest sat there unoccupied. This particular class is wonderful so there weren't any problems but I wouldn't count on that being the case in the future. From now on, I would work in groups (this was a class of 19 so perhaps groups of 5) and give the others a worksheet to occupy them until it was their turn.
What will become of the rovings? Check back in a few weeks because I've volunteered (i.e. no pay) to go back to the class in early June to finish up.
Wednesday, March 01, 2006
Felted Soap
You couldn't ask for a more simple, enjoyable, and fun project! And I'm not just talking about something for the kids.
To use these fuzzy creations, you simply get it wet under running water and rub the fiber to lather up the soap. When you're finished, wipe off the excess soap suds and let it sit to dry.
Felted soaps are a gardener's best friend. Their fuzzy texture with its built-in soap dispenser makes cleaning fingernails a breeze! In fact, these soaps are better than a loofah.
So how does one make felted soap? Read on!
Step 1
Using a bar of soap, you're going to wrap it in fiber. I've used roving made from alpaca neck and legs that I dyed green (and in later photos it "magically" turns purple :-) but you can use any carded clean fiber. I wouldn't use uncarded fiber because it tends to create a lumpy fiber covering.

Step 2
Using a gentle stream of water, wet the fiber and soap. As you are doing this, scrunch the entire thing to work up a soapy lather. An alternative is to add some soap foam from one of those hand soap dispensers that put out foam soap. This will get things started faster. Be careful not to shift the fiber in a way that creates holes. I've found the fiber felts pretty quickly so be sure to cover any bare spots right away. If you do end up with bare spots, you can try adding some more dry fiber. Sometimes this works, and sometimes this doesn't. It seems to depend on the type of fiber used.
Step 3
Felt. To wet felt (and not all fibers will felt - be sure to start with a feltable fiber like alpaca), fibers must be exposed to soap and agitation. Another component often found in wet felting is extreme temperature changes. Thankfully, we don't need that component in this process. So once you have a soapy lather, rub the bar of soap along its edges. The more you agitate the fiber, the more it will felt making a strong covering for the bar of soap.

Step 4
Rinse off the excess soap lather.

And you're done! Let it sit out to dry.

To use these fuzzy creations, you simply get it wet under running water and rub the fiber to lather up the soap. When you're finished, wipe off the excess soap suds and let it sit to dry.
Felted soaps are a gardener's best friend. Their fuzzy texture with its built-in soap dispenser makes cleaning fingernails a breeze! In fact, these soaps are better than a loofah.
So how does one make felted soap? Read on!
Step 1
Using a bar of soap, you're going to wrap it in fiber. I've used roving made from alpaca neck and legs that I dyed green (and in later photos it "magically" turns purple :-) but you can use any carded clean fiber. I wouldn't use uncarded fiber because it tends to create a lumpy fiber covering.

Step 2
Using a gentle stream of water, wet the fiber and soap. As you are doing this, scrunch the entire thing to work up a soapy lather. An alternative is to add some soap foam from one of those hand soap dispensers that put out foam soap. This will get things started faster. Be careful not to shift the fiber in a way that creates holes. I've found the fiber felts pretty quickly so be sure to cover any bare spots right away. If you do end up with bare spots, you can try adding some more dry fiber. Sometimes this works, and sometimes this doesn't. It seems to depend on the type of fiber used.

Step 3
Felt. To wet felt (and not all fibers will felt - be sure to start with a feltable fiber like alpaca), fibers must be exposed to soap and agitation. Another component often found in wet felting is extreme temperature changes. Thankfully, we don't need that component in this process. So once you have a soapy lather, rub the bar of soap along its edges. The more you agitate the fiber, the more it will felt making a strong covering for the bar of soap.

Step 4
Rinse off the excess soap lather.

And you're done! Let it sit out to dry.

Monday, November 01, 2004
AlpacaFest West 2004
Halloween Weekend at Firestone Winery is when and where SoCalpaca holds their annual alpaca show. This year's events included halter classes, agility/obstacle classes, and the most fun of all, costume classes! Check out the purple octopus on the right.

My personal fav is the Girl Scout with her S'More. " Cause everyone knows when you've had one alpaca, you'll want s'more!"

My personal fav is the Girl Scout with her S'More. " Cause everyone knows when you've had one alpaca, you'll want s'more!"
Tuesday, July 13, 2004
Fiber Competitions
My 9 year old daughter, Dana, participated in fiber-related competition this weekend. She was a member of a kids team in a Sheep to Shawl contest. That's where a team of 5-8 people (all kids in her case) take a clean sheep's fleece, card it, spin it, and then weave it on a pre-warped loom. Because their team was so young, they were allowed to weave a narrower piece. So I guess you could say they did a "Sheep To Scarf". The competition was held at the Alameda County Fair on Sunday.
There were a total of 6 teams: 4 womens teams, 1 kids team and 1 mens team.
Here's the scarf they did lying on the edge of a white table.

The warp was a burgundy wool along with a few grey strands of yarn. The weft, which is what was spun during the competition, was a grey Romney fleece.
The Results:
the kid's team tied for 3rd!! They were estatic!!
There were a total of 6 teams: 4 womens teams, 1 kids team and 1 mens team.
Here's the scarf they did lying on the edge of a white table.
The warp was a burgundy wool along with a few grey strands of yarn. The weft, which is what was spun during the competition, was a grey Romney fleece.
The Results:
the kid's team tied for 3rd!! They were estatic!!
Subscribe to:
Posts (Atom)